Selasa, 25 Desember 2012

Merry Christmas


Wishing everyone a Merry Christmas and a Happy New Year

May you and your family enjoy this wondrous day, sharing
remembrances, laughs, gifts, good food, and love.

May the world find peace and joy on this day.

Peace on earth
Jerry

Selasa, 18 Desember 2012

Shadowhouse Creations Action Set # 3


** EXAMPLES OF ACTIONS BEFORE & AFTER IN USE **


Miss You Guys


Sorry for the long absence, but personal health and family matters have been of most
concern over the last month.  I'm saddened to say that a member of my family has
passed away recently and the aftermath has left me quite numb.

If this wasn't enough, a family pet of twelve years passed away a week later, not  the
way I was hoping the Holidays would start out.  Christmas is my favorite time of the
year, but trying to get in the Christmas spirit is rather tough this year, so I'm looking
forward towards the new year.

My New Year resolution is to get back to posting on a regular basis and to work on
my facebook page, still trying to find a way to have my blog posts automatically post to facebook.


Sabtu, 17 November 2012

Liight Leak Texture Set


Liight Leak Texture Set contains seventeen digitally created faux Liight Leak
textures of various sizes,shapes and colors.
Just treat them as you would any other texture, by adjusting the Layer Modes and
Opacity to achieve various results.

I hope this set can be of some small help.


EXAMPLES POSTED BELOW 


DOWNLOAD THE ZIPPED SET HERE:


Selasa, 06 November 2012

Shadowhouse Creations Action Set 2


SC-Action-Set-2-promo-1
SC-Action-Set-2-promo-b

I'm touched by the results that my first action set garnered, and appreciate those who
honored the 5 dollar Paypal donation, thanks kindly.

I appreciate those who followed my wishes on the first set, but I have to say overall
it wasn't even close.  The sales doesn't even come close to the downloads.

I Knew going into the honor to pay idea was going to be a lopsided chance, but I was really
shocked to see the difference.

I'm going to give the honor to pay Paypal donation idea another chance, mainly to see if
this time will be closer than the first, I sure hope so, I have faith and believe truly
that that the majority of people are honest.

I'm asking for a $7.00 Paypal donation when downloading this set, this set of 5 actions
took a lot of my time to make, and I couldn't be happier with the results.

***  This action set is for those of you who have Photoshop CS3 and newer. ***

I tried my best to make it Photoshop Elements compatible, but it just wasn't working.
The main reason is some tools/elements of Photoshop that I used to compose this set
wouldn't work in Photoshop Elements, I have version 9.

This set has been tested in Photoshop CS3 and Photoshop CS6 and works perfectly with only one click in both versions.

The Actions Included are:

1: Magical Pop Effect
This action alone is worth the price of the set.
This action is a workhorse, and it will bring your photos to a new life with a big bang!

2: Classy HDR Effect
I'm not a big fan of the HDR effect, mainly because most people over use the effect, which
results in a cartoon like effect.  This action/effect I intended a more subtle HDR effect
without going overboard!

3: Vintage Light & Grain
This action lives up to its name, meaning it produces an tinted grainy/vintage effect with
a touch of lighting thrown in.

4: Enchanted Glow Effect
This action produces a nice soft glow and is at its best used on winter images, interior
lighting images or as a ethereal glow to portraits.

5: Retro Violet Effect
This along with "Magical Pop Effect" are my favorites, this action can be used in so many
settings, another workhorse!


Shadowhouse-Creations-Action-Set-2-promo2a
Shadowhouse-Creations-Action-Set-2-promo2b


DOWNLOAD ZIPPED SET HERE:


Kamis, 18 Oktober 2012

Shadowhouse Creations Actions Volume One


                             ** UPDATE ** 
I've made these available for PS Elements also, just click
on the Elements Download link.  Please try them out first
then pay, I'm rather a newb when working in PS Elements,
but I have them installed and working in PS Elements 9.
Adobe really, really needs to make installing actions a lot
more easier and consistent across all versions of Elements!

This, My Shadowhouse Creations Actions Volume One set
consumed quite a bit of my time and attention and I must say
I'm extremely pleased with the outcome. I also added a free
bonus to the deal, which you can see with examples by
clicking Read More!


*** I'm going to try something new for the first time, and I
must say that I've personally ever come across such an idea.***

I'm for the first time going to put a price on this download,
and it's what I call the honor system, if you decide to download,
and I hope you do, I'm asking a 5 dollar Paypal donation for this
set after you download and check it out. I know I can't stop people
from downloading "well actually I can, but I won't" without paying,
but I'm testing the waters so to speak on a new concept.

If this idea bombs, I'll have to set up a blog just for merchandise
I intend on selling in the near future.


Peace, and as always, have fun.


DOWNLOAD THE ZIPPED SET HERE

PS ELEMENTS DOWNLOAD


Jumat, 12 Oktober 2012

October 2012 Bokeh Set


I must say its nice to be back, been away due to poor health and the rigors of rehab.

October 2012 Bokeh Set contains twelve softly blurred bokeh textures.
The intent is to give a soft and faint bokeh effect, not to be the main focus of the image
its applied to. 

Hope they can be of use ~ have fun!


Download Zipped Set Here:


October 2012 Blurred Texture Set


October 2012 Blurred Texture Set contains twenty softly blurred, assorted and unique textures.
The intent is to give a soft and faint textured and tinted effect.

Hope they can be of use ~ have fun!

Download Zipped Set Here:


Kamis, 20 September 2012

September 2012 Texture Set & Walk Through


September 2012 Texture Set contains seven hand crafted textures meant to accompany
images to give subtle tones and textured effects.  Each texture measures 2861 X 1900
pixels in size.


Example one: Before image


Example 1:

Step 1: Open image chosen to use

Step 2: Open "Dead Skin" texture and set layer mode to "Linear Burn" and the opacity at 64%.

Step 3: Open "Old Yella" texture and set layer mode to "Soft Light" and the opacity at 100%
then go to filter , Gaussian Blur and set it at 7.0.

That's it, done!    ** See the after image below **


Example two: Before image below


Example 2:

Step 1: Open image chosen to use

Step 2: Open "Mashed Tatters" texture and set layer mode to "Hue" and the opacity at 38%.

Step 3:Open "Cancertankerous" texture and set layer mode to "Color Burn" and the opacity at 43%.

Love those deep burgandy tones,That's it!

Example 2: After image below


As always, hope these find a home in your toolbox  and some use

DOWNLOAD THE ZIPPED SET HERE:


Selasa, 18 September 2012

Antique White Action & Walk Through


I've been tinkering around with Photoshop actions for the last week, and although I'm
a heavy user of textures, I rarely ever use actions.  I've never really delved into making
actions seriously, but I thought it was time to finally do it, not an easy task on my part.


The before image is posted above.

Antique White Walk Through:

Step 1:Open Image which automatically becomes the background layer, click on the
background and duplicate the layer, then go to Filter and select Sharpen, then
select sharpen again.

Step 2:Go to Layer, select New Fill Layer, select solid color, click OK then enter
#e1dbbf and then OK - now select Multiply as the layer mode and set the opacity at 50%.

Step 3:Go back to the background layer and dupliate it again, then drag it on top
so its the top layer.

Step 4:Make sure the top layer is selected and go to Filter and select Stylize then
select emboss, now set the Height to 4 and the Amount at 56, click OK.  Now set the
layer mode to Color Dodge and the opacity to 30%.

Step 5: Now go to Image, then adjustments, and select Channel Mixer and set the Preset
to Custom, Red at +111,Green at +99, Blue at -58, and the Constant at -15 %, leave the
Monochrome unchecked, click OK.

Step 6: Go to Layer, select New Fill Layer, select solid color, click OK then enter
#efc3f0 and then OK - now select Linear Dodge as the layer mode and set the opacity at 32%.

Step 7: Go to Layer, New Adjustment Layer, select Brightness/Contrast, then set the Brightness
at -5 and the Contrast at +29, click OK.

Step 8: o to Layer, New Adjustment Layer, select Brightness/Contrast, then set the Brightness
at -9 and the Contrast at +18, click OK.


That's it, we're done.

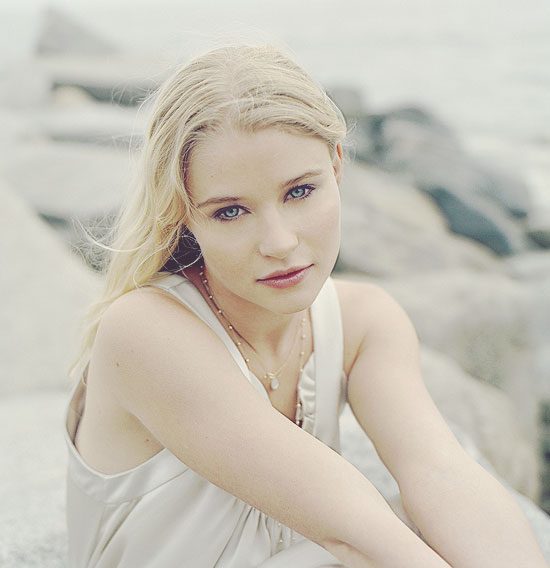
Here's the after image posted below.


Here's a couple more examples posted below:


Hopefully this can be of some small use, and keep an eye out for more actions in the
near future.

DOWNLOAD ZIPPED FILE HERE


Sabtu, 08 September 2012

Tinted Vintage Photo Textures


Tinted Vintage Photo Textures contains nine unique textures which can be applied
to images to present different vintage effects with the help of a photo editor like
Photoshop or an equivalent tool.


Textures included:

1.Softly Blurred Edges  -  2.Ghost Matter  -  3.Burnt Cream  -  4.Blurred Stucco

5.Alien Substance  -  6.Blurred Polaroid  -  7.Blurred Smoke  -  8.Dirty Spot

9.Scratched Overlay


Example One: Before


Example One: After


Example 1 - Shown Above

Step 1: Open an image to use.

Step 2: Apply "Softly Blurred Edges" texture, set the layer mode to (Saturation)
and the Opacity at 60%.

Step 3: Apply "Ghost Matter" texture, set the layer mode to (Color Burn)
and the Opacity at 50%.

Step 4: Apply "Burnt Cream" texture, set the layer mode to (Color Burn)
and the Opacity at 38%.

Step 5: Apply "Blurred Stucco" texture, set the layer mode to (Multiply)
and the Opacity at 59%.

Step 6: Apply "Alien Substance" texture, set the layer mode to (Soft Light)
and the Opacity at 100%.

Step 7: Optional / Apply "Blurred Polaroid" texture, set the layer mode to (Lighter Color)
and the Opacity at 100%.

Other Examples

Before


After


Before


After


Before


After


Example 4: Posted Above

Applied "Blurred Smoke" texture and set the Layer Mode to "Screen" and the opacity is set at 100%.


Before


After


Example 5: Posted Above

Step 1: Applied "Dirty Spot" texture and set the Layer Mode to "Saturation" and the opacity set at 100%

Step 2: Applied "Blurred Smoke" texture and set the Layer Mode to "Screen" and the opacity set at 25%

Step 3: Applied "Scratched Overlay" texture and set the Layer Mode to "Color Burned" and the opacity set at 60%


"I believe this set can be of some value to your texture catalog, hopefully it can be
of some use to you and your work."


DOWNLOAD ZIPPED SET HERE: