Rabu, 30 Juni 2010
Senin, 28 Juni 2010
Minggu, 27 Juni 2010
12 Free Must Have Fonts
For those who love collecting fonts, for whatever reason, whether for your artwork
or for making kits, here's a wonderful collection of twelve must have free fonts to add
to your ever growing collection.
" Read More"
1942 Download
Brock Script Download
Cleanvertising Download
Goudy Bookletter 1911 Download
Journal Download
Lemon Chicken Download
Orial Download
Ornatique Download
Quicksand Download
Tangerine Download
Vis A Vis Download
Zenda Download
Jumat, 25 Juni 2010
Kamis, 24 Juni 2010
Shadowhouse Creations Wallpaper ... it's all about the textures
Click image for larger view.
Shadowhouse Creations Wallpaper:
Share the love.
The new look, wallpaper in size resolutions shown below.
Shadowhouse Creations Wallpaper:
Share the love.
The new look, wallpaper in size resolutions shown below.
"Bring on the Wonder" by Susan Enan
I wish there was a real video to this song.
I love this song, and I heard it first on "Bones," hope you like it.
Rabu, 23 Juni 2010
Photoshop Tip "Brush Fading"
BRUSH FADING, here's a Photoshop brush tip many of you may not have heard of, or maybe it's something you may have forgotten over the years.
There's a way to make a brush "Fade Out" as the stroke continues. Almost like a real paint brush would.
Select a basic brush with your "Preset Picker." About 25 pixels or so would be a good size. Now, click on the "Brushes" tab on the upper right of your Photoshop working space ( or hit F5 ).
Click on "Shape Dynamics" and make sure Size Jitter,Minimum Diameter,Angle Jitter, and Roundness Jitter are all set at 0%. The Controls after Angle Jitter and Roundness Jitter should be set at "Off." (As Shown Above)
Now, next to the Control under "Size Jitter", click the small arrow on the right and select "Fade."
In that small box to the right of it, put in a number, somewhere between 50 and 300. Depending on how long your line is. This value is how many pixels out you want the line to go before it starts to fade out completely.
Now take the brush and paint on your canvas. You'll see it "Fade Out" as it goes on. What it's now doing is becoming smaller and smaller until the brush size is 0 pixels.
You can also make it actually fade out. Instead of (or in addition to) clicking on "Shape Dynamics," click on "Other Dynamics" under the brush tab menu.
Set everything to 0% and "Off" as before. Under the "Opacity Jitter" slider, change the "Control" on that to "Fade." Now, in the small box to the right of it, put in a value like you did before, 50 to 300 pixels, or as long as you need it to be. This works the same way, but it will actually fade out, instead of getting smaller, and actually I use both settings.
They both have their own different uses, but also work very well together.
Well, hopefully you learned something new here, and you may want to keep an eye out for more Photoshop tips in the near future.
There's a way to make a brush "Fade Out" as the stroke continues. Almost like a real paint brush would.
Select a basic brush with your "Preset Picker." About 25 pixels or so would be a good size. Now, click on the "Brushes" tab on the upper right of your Photoshop working space ( or hit F5 ).
Click on "Shape Dynamics" and make sure Size Jitter,Minimum Diameter,Angle Jitter, and Roundness Jitter are all set at 0%. The Controls after Angle Jitter and Roundness Jitter should be set at "Off." (As Shown Above)
Now, next to the Control under "Size Jitter", click the small arrow on the right and select "Fade."
In that small box to the right of it, put in a number, somewhere between 50 and 300. Depending on how long your line is. This value is how many pixels out you want the line to go before it starts to fade out completely.
Now take the brush and paint on your canvas. You'll see it "Fade Out" as it goes on. What it's now doing is becoming smaller and smaller until the brush size is 0 pixels.
You can also make it actually fade out. Instead of (or in addition to) clicking on "Shape Dynamics," click on "Other Dynamics" under the brush tab menu.
They both have their own different uses, but also work very well together.
Well, hopefully you learned something new here, and you may want to keep an eye out for more Photoshop tips in the near future.
Selasa, 22 Juni 2010
Senin, 21 Juni 2010
Minggu, 20 Juni 2010
Jumat, 18 Juni 2010
Sad to say ...
Sadly due to some recent comments/spam I've had to set up review comments before they are posted live.
I was really hoping to avoid such matters, but the ugly world and the people who sliver in it, I'm speaking of those who love to inject their underhand tactics upon others without conscious has found it's way to my doorsteps, so to avoid spreading their ugliness, I have adopted the review all comments before posting, hopefully this won't keep you. my true dear friends from future comments.
Peace Always
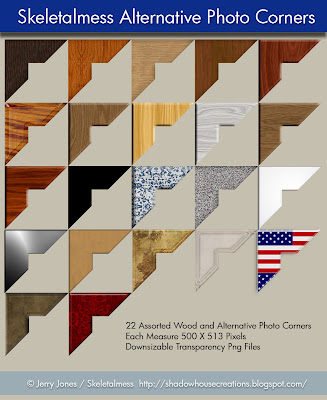
Skeletalmess Alternative Photo Corners
Download Zip
Click image for larger view.
Here's a little something different, but I hope it may be of some use.
Click image for larger view.
Here's a little something different, but I hope it may be of some use.
Rabu, 16 Juni 2010
Selasa, 15 Juni 2010
Polaroid Png Layer Mask
My Polaroid2 Download
This is a Png file and the measurements are 1200 X 1500 pixels.
All you need to do is open an image and drop this on top, adjust image to your liking.
Here's an example in use.
This is a Png file and the measurements are 1200 X 1500 pixels.
All you need to do is open an image and drop this on top, adjust image to your liking.
Here's an example in use.
Langganan:
Komentar (Atom)
