Kamis, 20 September 2012

September 2012 Texture Set & Walk Through


September 2012 Texture Set contains seven hand crafted textures meant to accompany
images to give subtle tones and textured effects.  Each texture measures 2861 X 1900
pixels in size.


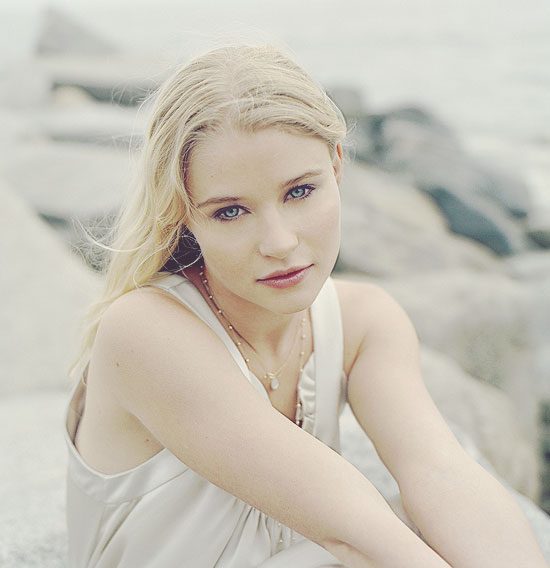
Example one: Before image


Example 1:

Step 1: Open image chosen to use

Step 2: Open "Dead Skin" texture and set layer mode to "Linear Burn" and the opacity at 64%.

Step 3: Open "Old Yella" texture and set layer mode to "Soft Light" and the opacity at 100%
then go to filter , Gaussian Blur and set it at 7.0.

That's it, done!    ** See the after image below **


Example two: Before image below


Example 2:

Step 1: Open image chosen to use

Step 2: Open "Mashed Tatters" texture and set layer mode to "Hue" and the opacity at 38%.

Step 3:Open "Cancertankerous" texture and set layer mode to "Color Burn" and the opacity at 43%.

Love those deep burgandy tones,That's it!

Example 2: After image below


As always, hope these find a home in your toolbox  and some use

DOWNLOAD THE ZIPPED SET HERE:


Selasa, 18 September 2012

Antique White Action & Walk Through


I've been tinkering around with Photoshop actions for the last week, and although I'm
a heavy user of textures, I rarely ever use actions.  I've never really delved into making
actions seriously, but I thought it was time to finally do it, not an easy task on my part.


The before image is posted above.

Antique White Walk Through:

Step 1:Open Image which automatically becomes the background layer, click on the
background and duplicate the layer, then go to Filter and select Sharpen, then
select sharpen again.

Step 2:Go to Layer, select New Fill Layer, select solid color, click OK then enter
#e1dbbf and then OK - now select Multiply as the layer mode and set the opacity at 50%.

Step 3:Go back to the background layer and dupliate it again, then drag it on top
so its the top layer.

Step 4:Make sure the top layer is selected and go to Filter and select Stylize then
select emboss, now set the Height to 4 and the Amount at 56, click OK.  Now set the
layer mode to Color Dodge and the opacity to 30%.

Step 5: Now go to Image, then adjustments, and select Channel Mixer and set the Preset
to Custom, Red at +111,Green at +99, Blue at -58, and the Constant at -15 %, leave the
Monochrome unchecked, click OK.

Step 6: Go to Layer, select New Fill Layer, select solid color, click OK then enter
#efc3f0 and then OK - now select Linear Dodge as the layer mode and set the opacity at 32%.

Step 7: Go to Layer, New Adjustment Layer, select Brightness/Contrast, then set the Brightness
at -5 and the Contrast at +29, click OK.

Step 8: o to Layer, New Adjustment Layer, select Brightness/Contrast, then set the Brightness
at -9 and the Contrast at +18, click OK.


That's it, we're done.

Here's the after image posted below.


Here's a couple more examples posted below:


Hopefully this can be of some small use, and keep an eye out for more actions in the
near future.

DOWNLOAD ZIPPED FILE HERE


Sabtu, 08 September 2012

Tinted Vintage Photo Textures


Tinted Vintage Photo Textures contains nine unique textures which can be applied
to images to present different vintage effects with the help of a photo editor like
Photoshop or an equivalent tool.


Textures included:

1.Softly Blurred Edges  -  2.Ghost Matter  -  3.Burnt Cream  -  4.Blurred Stucco

5.Alien Substance  -  6.Blurred Polaroid  -  7.Blurred Smoke  -  8.Dirty Spot

9.Scratched Overlay


Example One: Before


Example One: After


Example 1 - Shown Above

Step 1: Open an image to use.

Step 2: Apply "Softly Blurred Edges" texture, set the layer mode to (Saturation)
and the Opacity at 60%.

Step 3: Apply "Ghost Matter" texture, set the layer mode to (Color Burn)
and the Opacity at 50%.

Step 4: Apply "Burnt Cream" texture, set the layer mode to (Color Burn)
and the Opacity at 38%.

Step 5: Apply "Blurred Stucco" texture, set the layer mode to (Multiply)
and the Opacity at 59%.

Step 6: Apply "Alien Substance" texture, set the layer mode to (Soft Light)
and the Opacity at 100%.

Step 7: Optional / Apply "Blurred Polaroid" texture, set the layer mode to (Lighter Color)
and the Opacity at 100%.

Other Examples

Before


After


Before


After


Before


After


Example 4: Posted Above

Applied "Blurred Smoke" texture and set the Layer Mode to "Screen" and the opacity is set at 100%.


Before


After


Example 5: Posted Above

Step 1: Applied "Dirty Spot" texture and set the Layer Mode to "Saturation" and the opacity set at 100%

Step 2: Applied "Blurred Smoke" texture and set the Layer Mode to "Screen" and the opacity set at 25%

Step 3: Applied "Scratched Overlay" texture and set the Layer Mode to "Color Burned" and the opacity set at 60%


"I believe this set can be of some value to your texture catalog, hopefully it can be
of some use to you and your work."


DOWNLOAD ZIPPED SET HERE:


Sabtu, 01 September 2012

BlackBox Overlay Set 2


It's so nice to be back and creating some new things to share, hope you missed me,
I sure missed you guys.

BlackBox Overlay Set 2 contains as the banner states, 13 Overlays of various kinds,
each 2000 X 2000 pixels each.


Example 1: using BlackBox 12

I'm using a wonderful portrait of Mary Louise Parker, sigh!

1. Open image

2. Open BlackBox 12 Overlay > set layer mode to Screen and leave the Opacity at 100%.

3. Optional ~ I've chosen to add a colored tint, go to Layer > select > New Fill Layer
> Solid Color > then I choose #b9ab90 as my tint to use then I set the Layer Mode at
Soft Light and again I leave the Opacity at 100%.

Ta Da .............. I'm happy with my results.


Example 2 Original Image:


Example 2: using BlackBox 9

1. Open Image

2. Open BlackBox 9 > set the Layer Mode at Lighten and the Opacity leave at 100%.

3. Optional ~ I've chosen to add a colored tint, go to Layer > select > New Fill Layer
> Solid Color > b9ab90 as my tint, which gives the cold winter image a vintage feel.

4. Don't be afraid to experiment with solid colors on top of the overlays, here I
decide to use another solid color layer #b1d6d8 on top of the previous solid color
overlay and set the Layer Mode to Color Burn and the Opacity leave at 100%.

I'm satisfied with my results, which I feel gives the image a more acurate vintage look.


Example 2 step 1 "above"


Example 2 step 2 "above"


DOWNLOAD THE ZIPPED FILE HERE:


Thought you should know!

This is a follow up to my last post concerning 4Shared and it's yearly storage plan.

After receiving their last reply simply saying wait till the end of the month, I had
no other option other than respond saying my subscription ends the 28th of August
and I can't wait and watch it run out, especially with 700 + web posts and download
links hanging in the balance.  I sent this last Friday and still no response, so I downloaded all of my folders and have painstakingly been re-uploading my files to another provider, and I can't say how much of a pain not to mention it's always slower to upload than download.

As I stated in my last post, I had concerns about resigning with what they called a reseller, which all were stationed overseas, I have concerns about giving my personal and bank data to foreign businesses, I know the majority of suspected web storage providers reside overseas and I read about some of them, not all and their illegal activity daily on the web, better to be cautious than unwise.

After thinking about the laborious duty of re-uploading all those files and having to post all new direct links to each post, I thought, give it a shot and try to resign with a reseller that 4Shared states my best option, off I go to my first choice finding out that they are out of stock, huh!
I try another, only to get we're not accepting new customers, well ain't this the pits, again I try yet another, only to get we're not accepting cards, or Paypal at this time ............. I see a shady trend.

I try four more, only to get one of many questionable reasons reasons why they aren't accepting new accounts.  I even try a 6 month term only to receive the same responses.

So, I am not about to do further business with 4shared, and I hope I can help and discourage someone else from thinking about 4shared and their inability to renew a yearly subscription, sad, sad business practice.


I'm feeling much better in health as opposed to the last couple of weeks, following the Doctors orders and getting plenty of rest seems to have worked.

I've replaced my yearly 4shared Pro subscription with a yearly Pro subscription with Mediafire, which uploading numerous files and replacing download URLs was an extreme and tedious task but all is done for now.

*** If by any chance you have a problem with a Direct Download link, please  let me know, and name the file in question .............thanks.